NEMARC Meshtastic 900 MHz Project!
What is Meshtastic?
Perplexity defines Meshtastic as "an open-source, off-grid communication platform that uses low-power radio frequencies to enable long-range communication without the need for existing infrastructure like cell towers or internet".
Think of Meshtastic as a way to send text messages, just as you text on your cell phone, Discord chat room or Messenger chat group, without the need for Internet or a service provider of any kind. Meshtastic is primarily text-based. Messages are optionally encrypted during transmission and display as text on your cell phone or tablet, using a free app (Android and iPhone), much like your cell phone, Discord or Messenger.
Meshtastic can be set up with individual channels, such as our NEMARC channel (you'll find the channel settings as a pinned message in our Discord clubhouse), a channel for your family, as well as the ability to send direct messages. You do not need an Amateur Radio license to participate!
Since each node automatically relays your text message to the other nodes it hears, with a good network in place, significant range is possible! Each relay is called a hop.
Designed as a low power system, optionally using solar panels and batteries, our Meshtastic network ideally will stay live, even when the grid and / or Internet are out. Like our other Amateur Radio communications, in addition to the fun of daily use, with connectivity, Meshtastic can be used to message your friends and family members who are also on our network anytime, even when conventional services are off line due to wind, hurricanes, blizzards, ice storms, solar flares, who knows what!
What is the goal for NEMARC's Meshtastic project?
To have fun seeing if we can meet the tall challenge of creating a Meshtastic network using very low power on the ultra high frequency (UHF) 915 MHz band to include as many NEMARC members as possible. This band is new to many of us and we will enjoy learning the propagation characteristics of 915 MHz as we experiment and build out our network.
How does it work?
When you join in, your Meshtastic device will become another node on our network. Your node will automatically find and relay any messages it receives, so the more nodes we have, the better the coverage and the more robust our network will be. We can deploy additional nodes if we like to help enhance our network, including pulling them high in trees, attaching to roof vent pipes, etc. Your participation not only connects you with the group, but you are providing a service to all of us, with the additional coverage that your node will provide!
Is it expensive or complicated?
It is very easy to set up and this may be the least expensive Amateur Radio pursuit you'll ever experience! Your entire cost to start can be as low as $25 for a simple Lilygo board in your house (and these boards are tiny)! They can be powered by a typical cell phone charger. If you want to build a high performance node, at 915 MHz, even high gain antennas are relatively small and inexpensive.
The only required construction with the Lilygo board is screwing on the included antenna. It could not be easier to get started!
One caution - be sure to connect your antenna to your board before you plug in a power source (battery, wall charger or PC)!
What range should I expect?
In unlicensed status we can run up to one watt output (30 dBm). That said, most transceiver boards are less than one watt (22 dBm is only 160 milliwatts, so we are running really low power). As we increase in frequency, signals become more line of sight, making hills greater barriers.
We are early in our testing, but based on our real world observations running 160 mW for our area so far, if you and the node you are connecting to are both on average terrain (not behind a large hill), and you are both using 2 inch antennas indoors, you may need to be within 1/4 to 1/2 mile of each other.

With both nodes running larger, higher, gain antenna outdoors, two to three miles or more per hop is easily obtainable. Of course, hilltop to hilltop nodes can provide significantly more range.
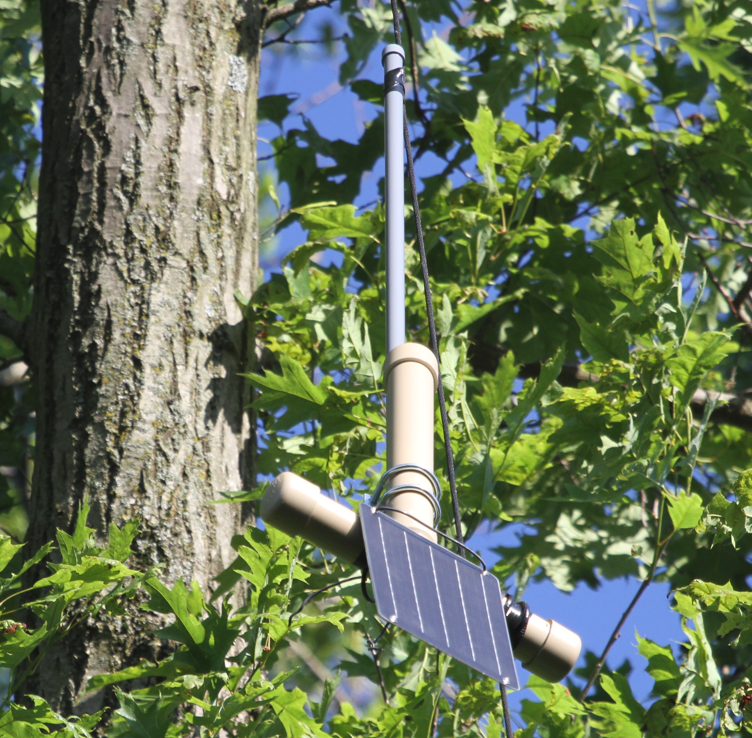
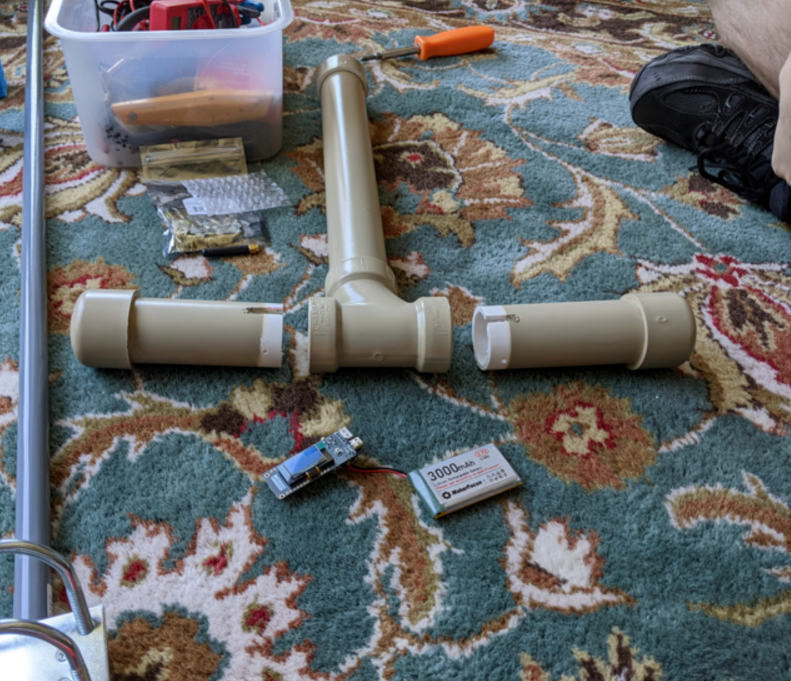
The housing for this node above is simply 1 1/2" PVC, 3 end caps and one T. All components slide nicely inside without the need to otherwise secure them. Complete constructions details are here and the parts list is below.
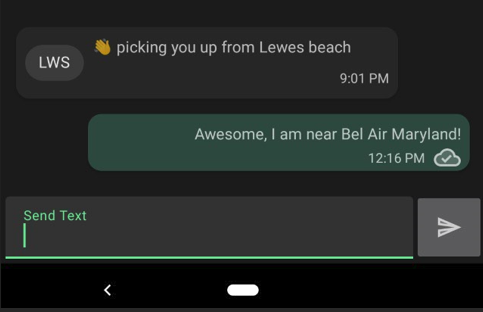
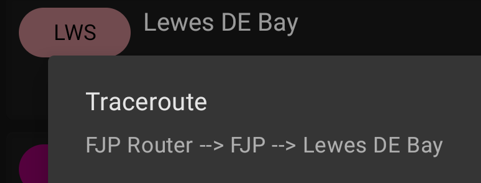
And while it didn't last long, we did experience an 80 mile opening from Bel Air, MD to Lewes Beach, DE the first evening we put up the tree node!
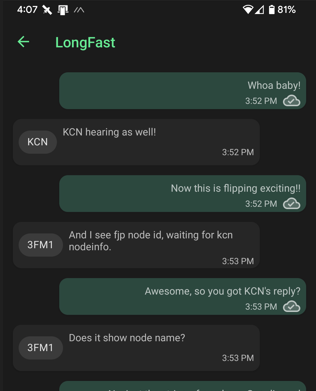
Here is the confirming traceroute. At the time, FJP Router was indoors and FJP was in the tree.
As of 8/15/2024, here is the typical mesh layout of our local cluster (blue lines are trace routes). As long as a node can reach the cluster, we can all text to any individual or everyone collectively, without any need for the Internet! All but one of the nodes are only running 160 mW currently. FJP1, my tree node, is under KCN in the screen capture:
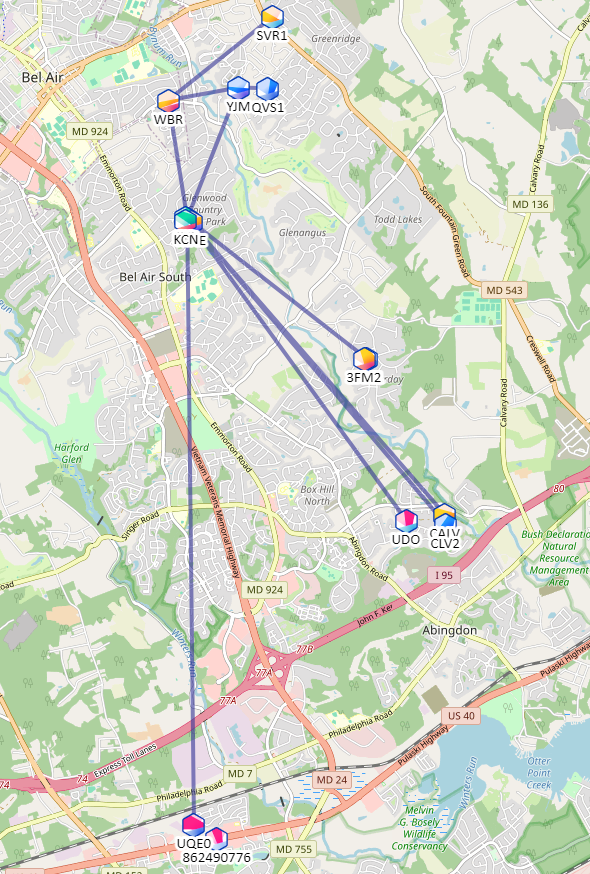
Our free Affirmatech - N3FJP MeshSense software (for Windows, Mac and Linux) displays the current condition of our network along with signal reports, trace routes and other real time data. You can see our network in real time as received via FJP1 node here! You can see all the mesh clusters around the world who are using our MeshSense software on our global map here.
What are the considerations for locating my primary node?
There are two range considerations - Bluetooth (or WiFi) to your cell phone (or PC) and 915 MHz to other nodes. You connect your cell phone or tablet to your transceiver via a free phone app to send text messages via Bluetooth or WiFi. With WiFi, you can also use a web browser to connect.
I have my transceiver at one end of my house and have no problem staying Bluetooth connected from anywhere in the house. The 915 MHz connection is how the transceiver nodes talk to each other. Having your transceiver placed as high as possible (roof, attic or top floor), while still being able to reach it from your phone is the way to go.
Those of us who have the opportunity to pull nodes up high in trees, mount on roofs or in attics, that are better for our network but exceed our Bluetooth range are simply running two nodes. Your node in your house keeps you Bluetooth connected and easily reaches your higher node, which gives you a strong link to the network.
Why did you choose the 915 MHz band in unlicensed status?
While in unlicensed status our maximum output is one watt (30 dBm), we decided on that route for a couple reasons:
- 915 MHz is the USA standard.
- Unlicensed folks can participate too, so there is the potential for more nodes on that frequency.
- We can use encryption. Encryption is prohibited with Amateur Radio transmissions.
- If we choose a band or power level requiring our Amateur Radio license, we would be operating under Amateur Radio license rules. We suspect we would be in violation of FCC rules if our node happened to retransmit a curse word for example. In unlicensed status, the messages are encrypted and we are not operating under our Amateur Radio calls, so we need not worry about risking our Amateur Radio licenses.
When I set up my node, what naming convention should I use?
The long term goal is that we all have nodes that can see each other, either directly, or by relay from intermediate nodes, so that we can group chat on Meshtastic as we do in our Discord clubhouse. The Meshtastic channel display only allows four characters. As more folks come on line, it will be nice to know who we are chatting with!
We are used to referring to each other by our call signs, and in casual conversation off line via our suffixes, YJM, JX, FJP, etc., so we suggest using our suffixes (or full call if four character call, such as N3FM) to identify our home nodes.
If you add additional repeaters, just add a consecutive numeric value. For example, N3FJP's indoor node is FJP and his tree repeater is FJP1. Having a four character call, N3FM's repeater is 3FM1.
Even if you aren't an Amateur Radio operator, you are very welcome and we would love to have you join in! Just use your initials or other identifying characters.
Everyone is welcome to choose an alternative identifier, but having some uniformity will add credibility to the Meshtastic network we are building. Also, actually knowing who sent what message obviously has value, as well as easily being able to identify what nodes our transceivers are receiving.
A Few Settings to Modify From Default:
In the Meshtastic app, please change these settings:
- Please tap the 3 dots, Radio Configuration > User. Enter your call suffix (or full call if 4 character) for short name, or initials if unlicensed. For the long name, also include some description of your location, such as Bel Air, MD.
- We want all our connections to be locally via RF. We do NOT want MQTT nodes from all across the country gumming up our local traffic and monopolizing our resources. Please tap the 3 dots, Radio Configuration > LoRa and enable Ignore MQTT (near the bottom). Then tap Send.
- With multiple nodes of minimal range, too low a hop limit and you may not reach your destination. Too high a limit will overtax a network. We are recommending setting your hop limit to 7 for now, until more high performance nodes come on line. Please tap the 3 dots, Radio Configuration > LoRa and change hop limit to 7. Then tap Send.
- Please do not enable the Heartbeat option, as it causes apps to sound alerts as if a genuine message has been received. Thankfully it is disabled by default. If you are receiving Heartbeat notifications from another node, long press the node sending Heartbeats in the node list and select the option to Ignore.
Resources:
Transceiver:
- Lilygo:
This is only $25 and has everything you need to get started (except a power supply, such as a cell phone charger). Be sure to select SX1262 915 MHz:
https://www.amazon.com/LILYGO-ESP32-S3-Bluetooth-Wireless-Development/dp/B0BW5W9QXZ/
The Lilygo includes battery protection. If the battery runs all the way down, it will disconnect to keep from damaging the battery. When the sun comes out it will start charging again, but you have to turn the unit off and back on to otherwise bring it back to life. Not something you want to do in mid winter, so use two batteries!
We've found in our deployments that the Lilygo is fine for home use connected to a conventional power source (optionally with battery backup), but has a much higher current drain than the Rak Wisblock. For solar powered nodes, choose the Wisblock.
- Rak Wireless Wisblock:
Here is another popular board that has far lower power consumption, which is an important consideration if you are planning a remote deployment:
https://www.amazon.com/dp/B0CHKZJK9C
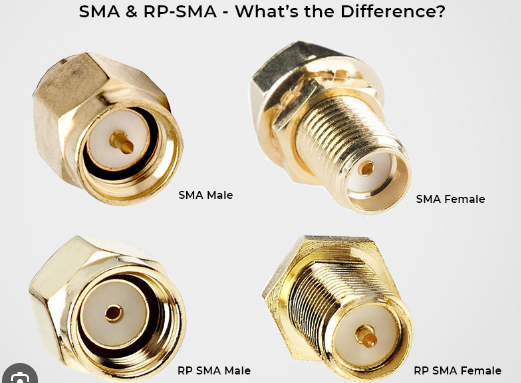
Be aware that the Wisblock has a different antenna connector (depends on kit - IPX at board and some include RP SMA adapter but you may need an SMA adapter or IPX to male N jumper), different battery connector and the battery polarity connector does not have a standard polarity (with the linked connectors, black is soldered to positive), so there are some things to be aware of if you plan to connect a battery or use an antenna other than the stock antenna with Wisblock. This Wisblock does not include WiFi, so go with Lilygo if WiFi is needed.
In June, with two, 3000 mAh batteries in parallel, the Wisblock seldom drops below 90% charge overnight. At first light it begins charging and is often back to 100% before the sun is above the horizon!
Battery:
Optional for indoor home but recommended to keep your node up when the power goes. Make sure you choose the proper battery connector size and polarity for your board.
This is a 4 pack, but you only need one (or two for remote deployment). It plugs right in to the Lilygo transceiver board, but you will have to solder on a different connector if you plan to use a Wisblock. Also note that in our case black and red were reversed and we actually had to solder black to positive for WisBlock, so look carefully at the board for the + by the connector to be sure.
https://www.amazon.com/dp/B08T6GT7DV?th=1
For our remote node, we wired two, 3000 mAh batteries in parallel for 6000 mAh total storage (soldered the battery lead wires together, red to red and black to black), which should get us though multiple, consecutive overcast days. The two batteries taped together, side by side, slid nicely inside the 1 1/2" PVC. Note that we understand if you connect two batteries in parallel, they should be nearly the same voltage, or the little wires will overheat. To ensure the voltages would be close, we took two brand new batteries out of the box (one was 3.95V and one was 3.97V), so we had no problem. The wires never warmed at all.
Antenna:
With 160 milliwatts, we need all the antenna performance we can get! If you are planning a high performance node, this 9 dBi omni directional antenna will be a good choice. Or this smaller, but still high performing 8 dBi option is very good as well.
To connect this antenna to the Lilygo, you will need this N to SMA adapter. Note the SMA and RP SMA are not the same, so be sure to order an SMA male for the Lilygo.
For Wisblock, assuming you have IPX at the board and RP SMA female adapter, you will need this N male to RP SMA male, or direct with an IPX to N male connector.
1 Watt Amplifier + Receive Preamp
Most stock Meshtastic boards are only 160 milliwatts. In unlicensed status, we are allowed to run up to 1 watt, which is a big jump in power! Some of the folks in our group are starting to use these little one watt amps / preamps that currently are only $13.70 (for first time purchasers). With 3.6V to 6V power input requirements, the same battery bank that powers your node can power the amp in remote deployments, too! When you go to the link, be sure to select the color option for the 868 MHz version.
Solar Panel
Here is one of many solar panels to choose from. With a USB A to USB C adapter, it will plug right into both the Lilygo and Wisblock boards. Just be careful to choose one with appropriate voltage for your board (5V is fine).
Setup Guide:
This is a very simple and straightforward setup guide, the only difference for us is that we have Lilygo T3S3 instead of T-Beams. Also, our Lilygo units had the Meshtastic software already installed, so we didn't have to do that or update the firmware.
https://www.youtube.com/watch?v=mj8yAi7D688
Tree Node Pictorial Construction
Here are pictures of the simple, inexpensive construction of a node hanging from a tree limb at 70 feet, using 1 1/2" PVC pipe.
Meshtastic Overview:
Here is one of many intro videos. You only need watch the first few minutes:
https://www.youtube.com/watch?v=DumgHz56IjI
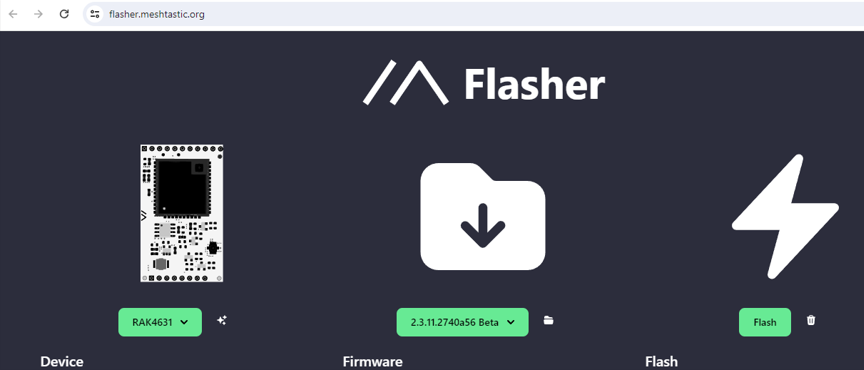
Meshtastic Firmware Flasher
Use this site to flash your board.
https://flasher.meshtastic.org/
Steps to Flash
Rak WisBlock 4631
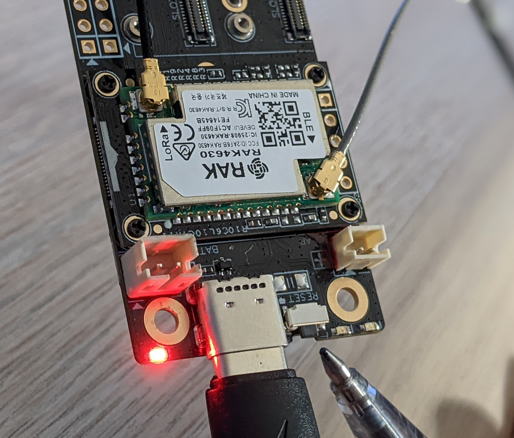
1. Attach your antenna(s)! You must do this first. Otherwise, you could damage your board during configuration when it tries to transmit without one. With most boards, this is the only mechanical construction required. Many just have a single, screw on antenna.
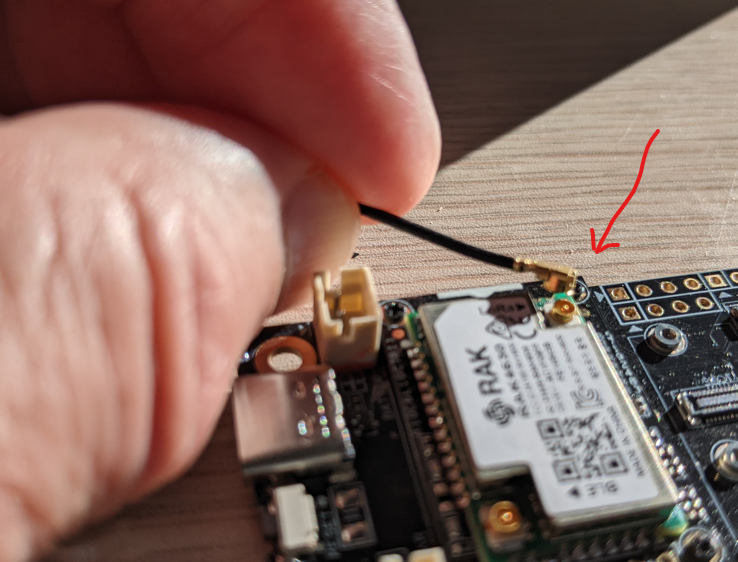
The WisBlock has two small IPX antenna ports. One is for LoRa and the other is for Bluetooth. When the connector is lined up properly, it will snap in easily without pressing hard.
2. Navigate to: https://flasher.meshtastic.org/
3. Plug in your WisBlock to your PC
4. Select your device, the latest stable firmware and then click Flash.
5. Follow the steps on the form that appears. You must double press the reset (RST) button (where the pen is pointing) to put your board in flash mode.
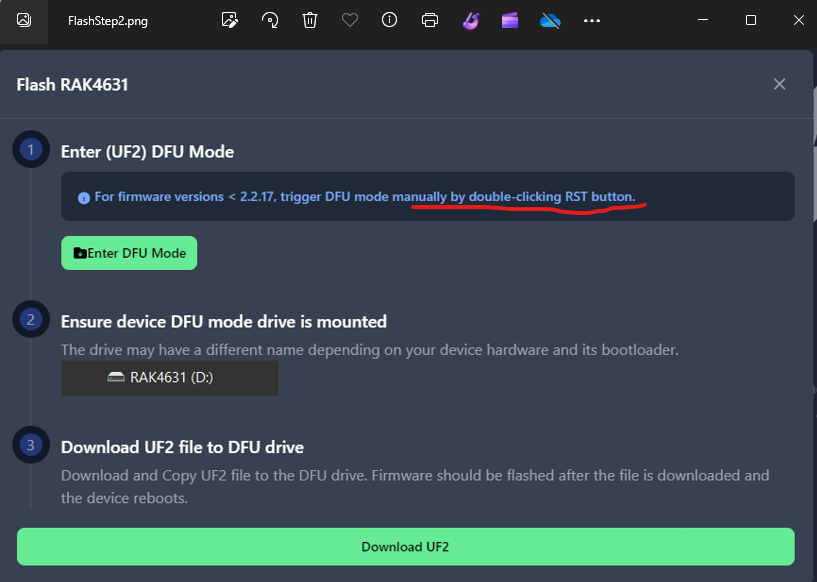
6. After double pressing, a directory on the WisBlock will be presented to you on your PC.

7. On the Meshtastic flasher website, click the large green Download button. A Save As dialogue will appear. Save the file to the WisBlock directory.

8. Start your Meshtastic app and tap the right gear display and then the plus to add your device (Android displayed here). Then tap on the newly listed device.
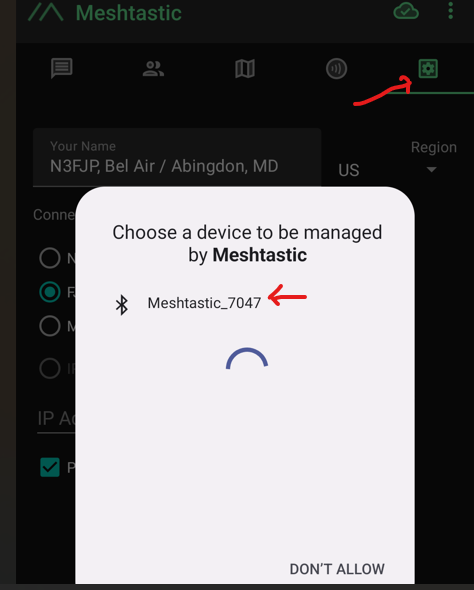
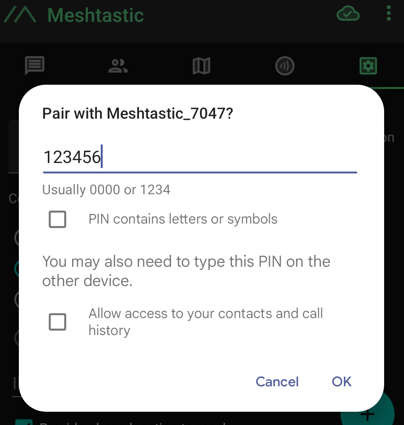
9. Then enter your pin. Some devices will show a pin if they have a display, but the WisBlock is just 123456. Then tap OK.
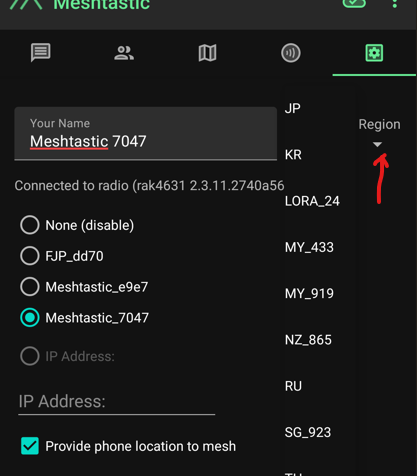
10. Then select your new node. It is very important to select the Region (US). Your new node is ready and will begin working immediately! You can now customize any additional preferences you like!
Lilygo T3S3 ESP32-S3
We did not collect as many images when flashing our Lilygo board. If you are flashing a Lilygo and can screen capture associated images for these steps, we would be grateful if you would send them along.
1. Attach your antenna! You must do this first. Otherwise, you could damage your board during configuration when it tries to transmit without one. Simply screw the included antenna on to the SMA jack. That is the only assembly required with the Lilygo board!
2. Navigate to: https://flasher.meshtastic.org/
3. Plug in your Lilygo to your PC. If your board is ESP32-S3 based, hold the BOOT button when plugging in the USB. The display will remain blank.
4. Select your device, the latest stable firmware and then click Flash > Full Erase and Install. When you see the "Waiting for download" message, the flash is actually complete.

5. Start your Meshtastic app and tap the right gear display and then the plus to add your device. Then tap on the newly listed device.
6. Then select your new node. It is very important to select the Region (US). Your new node is ready and will begin working immediately! You can now customize any additional preferences you like!
Tree Node Parts List
RAK wireless WisBlock Meshtastic Starter Kit US915 Base RAK19007 + Core RAK4631
For those of you who just want to set up an indoor node, the above is the ONLY thing you need.
4pcs 3.7V 3000mAh Lithium Rechargeable Battery 1S 1C Lipo Battery (I wired two in parallel, though the WisBlock is so light on battery, one may be sufficient)
LoRa Antenna 915MHz Kit 8dBi Gain Outdoor Omni-Direction HNT Miner Antenna 3.6 ft Helium Hotspot Antenna (there is a larger, 9 dBi version but it has been out of stock for a while. Mine is 8 dBi)
1ft USB C Cable 3A Fast Charge, Short USB A (The panel is USB A and board is USB C).
The antenna has an N connector and the board has an IPX connector. I could not find any IPX to male N, so used two cables to get there:
Battery connector for Wisblock (note on our board, we actually had to solder black to the positive battery lead)
For the housing, we just slid the board and batteries into 1 1/2" PVC pipe. They fit nicely without any additional mounting or securing required. Home Depot delivers the following for free:
We also used 1 brass screw on each side of the T to secure the PVC to the T and allow for easy disassembly. The end caps seemed snug enough that we did not use screws.
Our construction steps are detailed here.
Copyright 2003-2024